And here it is!
The finished piece! I used a bit of light blue gilder's paste on the front to give it a bit of color. The design was cleaned up a bit more after this picture was taken, and was given to my mom soon after. I forgot to get a true final picture.
This one was a lot of fun to make, even with all the troubles. I had to saw the two pieces apart once after accidentally soldering it closed. There was also the frustration in getting the hinge properly attached. The two outer knuckles of the hinge had to be attached to one plate, while the middle hinge was attached to the other and yet they needed to be soldered perfectly in line in order to fit the hinge pin. *whew!*
I really want to try making one of these again on my own, but I'll definitely need to acquire quite a few tools before that can happen. Ah, well!
Oh, and I should mention... I got a great shine on this piece after putting it in a tumbler with stainless steel shot and some dawn soap for a half hour or so. Definitely an important finishing step if you want your piece to really sparkle!
This next project took me around 10 Saturdays to complete, so I think it should take at least two posts to properly show it off.
I took a locket making class at my local university and knew it was going to be for my mother. The perfect Christmas present, right? Well, this one actually took so long to complete that she didn't actually get it until February. *blush*
So here are the pieces after they had been cut out from the sheet metal.
So, the way this worked was I cut two circles from 20 gauge silver sheet metal which would become the outer part of the locket. Then I cut two circles from 26 gauge silver which became the bearing plates for the inside of the locket. As you can see in the piece to the far right, after doming the large pieces and soldering the cut out circles/bearing plates on, you create a place to insert pictures inside the locket!
Here is a close up of the design I chose to put on the front. It is always best to have the design in place before doming or soldering the pieces!
Here is an excellent step by step tutorial for making a locket! Really, I think my instructor must have taught the class from this tutorial!
I just also want to say that you definitely need a good amount of soldering experience before attempting a project like this. I still count myself a soldering beginner and this project was a bit... difficult. At one point, I actually soldered the entire locket together! It was definitely the hardest part in my opinion!
Next time I'll have some pictures of the finished product!
Here it is! Rivet and all!

An exciting first project. I already have a few more planned that I will have to make as soon as I can get my own jeweler's saw and the rest of the equipment. As for my next class, we are going to make a silver ring and I have to start thinking on the design for it.
Oh, here is an excellent video tutorial for riveting!

Well, we didn't exactly get to the riveting last night. Instead we worked on texture and annealing.
For my piece I chose to texture it using a dapping tool. I really like the speckled effect! It kind of reminds me of a starry sky.

Additionally, we learned a bit about patinas including using liver of sulfur on both bronze and copper. I already posted about my experiences using this substance, so I will just post a quick link back to my previous posts where you can find examples of copper pieces that have been patinated as well as a quick tutorial link.

I still have a bit of polishing left to do as well before the two pieces can be joined. Again, next week I should be back with a post on riveting! The next project after this is to make a silver ring and I just cannot wait to come back here with a finished piece!
I just had my first metalsmithing class yesterday! I am so excited for this one!
For the first class we learned about using the jeweler's saw to cut shapes out of sheet metal. Here are the pictures of my first shapes!

Here are some helpful instructional videos for using the jeweler's saw. In my class we started with small sheets of copper and brass at 18 gauge and size 1 saw blades from RioGrande. Also, always be sure to use eye protection! Those saw blades do break pretty easily.
Additionally, we learned how to file the metal pieces after sawing to get a smooth edge and to get rid of any sharp spots. Here is a good list of tips for filing and smoothing metal bits.
Next week we are going to learn about riveting, so I will be back then!

I have been trying to come up with a New Year's Resolution recently that I can reasonably succeed at without failing in the first few weeks! Well, I stumbled on to FabricFascination's blog and have decided to do this same resoltion:
Challenge myself to complete at least one project every week in 2011.
It doesn't sound horribly hard, but at the same time this will also be my first full year crafting for my Etsy shop. There will definitely be more times when I will need a bit of extra motivation!
Here it is, my first project of the new year completed!

Also, I have been trying to come up with my next tutorial project and have finally found one! I am gathering the supplies now and will definitely be posting the project within the next few weeks! *sneaky sneaky*
Happy New Year!!
Finished two! Yay!
Here are my first attempts. I actually really like the way these turned out! The hardest part about making these is finding the right size to clip on to the ear. The first one I made (not pictured) was actually waaaay too small. These turned out just right!

I decided to add a garnet bead to the second one I made. Just a bit of extra ornamentation!

Definitely going to have to play with these more!
Oh, and the picture above? Extremely hard to take when you are wearing the ear piece and trying to take the picture at the same time!!
Posted by
Laurel Collins
1:51 AM
It's time for a new tutorial!
The other day on etsy I ran across pictures of some amazing ear cuffs made by gailavira which made me really want to try and make some wire ear cuffs. I found this tutorial on CutOutandKeep.net and realized that ear cuffs can be quite simplistic and that maybe a tutorial for them really isn't necessary.
I am definitely going to play with this style a bit tomorrow and will post my experiments.
Here is another wire wrapped labradorite pendant! This time I added in a bit of copper and I am really loving the effect!

Additionally I have been trying a new type of crafting. Recently my boyfriend has become interested in brewing. It is an interesting process, so I am going to try a bit of brewing myself. He likes to make beer, but I am interested more in wines and mead, so this weekend I am going to start the process of creating a Maple Mead. I found the recipe here. Should be interesting and I definitely can't wait for the taste testing!
Here are a few of my finished items using oxidization. I just love how it makes a wire wrapped piece look so elegant! I think I am going to keep doing this technique with future pieces I make. It gives them a depth that you don't see in a normal polished piece.


Hee hee! Yep, been a bit since I posted last! Vacation lasted a bit longer than I thought it would, so there was a little lack of crafting.
Anyways, I am back now and have crafted a few things since my last post. I am so enamored with the labradorite cabochons, that I went on a wire wrapping spree and finished wrapping all five stones that I purchased. I'll post the three newest ones below. Two were still working from the original tutorial that I had posted.


The newest is slightly different, but I definitely like how it turned out. I would love to try it again with a thinner stone.

I am so attracted to these stones, that it is hard for me to want to try and work on anything else. I think after a few more of these, the novelty will wear off slightly and I will be able to move on to a new tutorial. I have a few already in the queue, but I am not sure which one will be next. We shall see!
Let's see... I tried out the tutorial below for the Wire Wrapped Rock, but unfortunately I had the wrong sized stone. I had to do things a bit differently, but for my first wire wrapped stone pendant, I think this one turned out well! It didn't turn out quite like I had hoped, so I think I will just end up keeping this one.... Here it is!

I just love labradorite! Such pretty colors. I have a few more labradorite cabochons coming in the mail, so I will have to try this tutorial again! Also, I think for my next one I am going to try oxidizing the wire afterwards for an antiqued look. I guess I will update again when I get a chance to test this next time.
I have been looking around and have found quite a few different projects to try. Of course, I just don't have the right materials for most of them.
This is the one I would like to try next: Wire Wrapped Rock. I have most of the materials for this one, but I am waiting for a few things to come in the mail, so it will be a bit before I can get started.
The author of this tutorial, Dev Khan, has done some amazing work and I can only hope that in the future I can become even half as good an artist as her!

And now it is 4 am. Really need to stop posting so late when my writing and brain functions become fragmented....
Oh! I can't believe I almost forgot to mention that I did finish my second crop circle pendant! Here is the finished product:

It isn't exactly like the crop circle pictured, but I think it turned out well! Need to find a new one to start on!
Wow, it has been a bit since I last posted. I'll try not to do it again!
Anyways, on Etsy I am a member of TeamBPAL. This week a team shop was set up where members could donate items to be sold for a cause. At the moment, the shop is filled with ocean/sea themed items. Each item sold will have all the proceeds donated to the Sea Turtle Restoration Project. I decided to donate two items of my own.

Both items are shell necklaces like those I have made in the past. The one pictured above has already been sold! Yay!

I think it is great to donate to such a cause and can't wait to participate in others for the future! Here is another item made by Elements & Artifacts on Etsy that I think is just fabulous!

So, it has been awhile since I have experimented with a new technique/tutorial, so I am going to search out one to try next. Also, I am thinking about trying to make some chainmail jewelry in the future. Haven't gotten any supplies for it yet though. Someday!
Here is a quick spur of the moment project I finished a few days ago. I only had a little bit of silver wire left, so I decided to try and craft a ring! Here is what I came up with:

It was a bit difficult to get the wire to cooperate, but I think it turned out okay in the end! I used small lapis lazuli beads for this ring since they looked so nice with the silver.

I have to admit that I was a little hesitant to post the picture of me wearing it... I always feel like my fingers look silly in photographs. Silly fingers!
Here is the video that I first saw explaining how to make wire wrapped rings: Auntie's Beads. This tutorial is quite helpful in showing the basics! And wow there are loads of tutorials up on YouTube! Will have to check out a few more later.
That is all for tonight! It is late and I should be asleep... *sigh*
Yay! I finished my first crop circle pendant and added the chain. I feel like it turned out pretty nice! Kinda big though, the pendant itself measures 2.25 inches in diameter. I guess if anyone were to wear it, it would make quite a statement! Hee hee!

Also, I just finished using my new glass etcher! I seriously love it! It is just like drawing on glass.

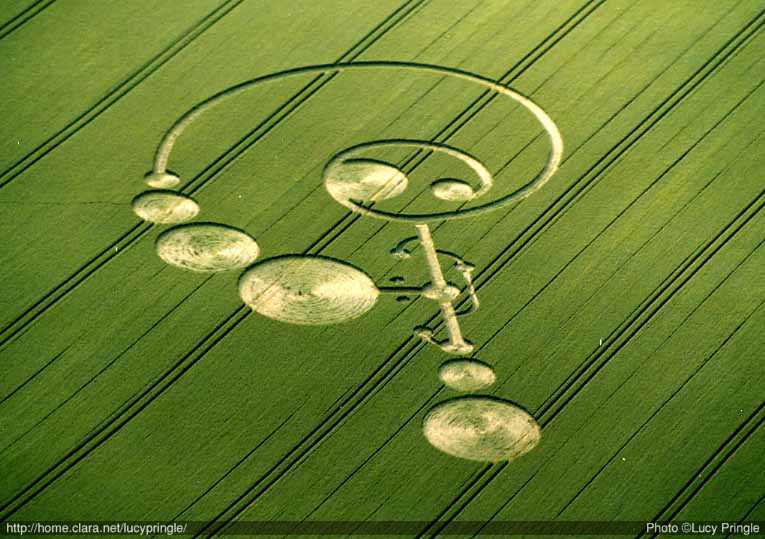
And lastly, my next project I am currently working on is a new crop circle! Here is the inspiration photo:

Here is what I have completed so far:

All I have to do is attach the two pieces, maybe add another bead or two... We shall see!
Getting close to finishing my first crop circle pendant! This one took quite a bit of work to make!
Looking at it now, I think it is actually a bit bigger than I had originally expected to make. I like it though! I found some pretty garnet beads for embellishment and everything seems to have come together quite well. I still plan on wire wrapping the surrounding circle as well.

At the same time, I am around halfway through knitting a scarf for my grandmother! I made a scarf for a friend at Christmas and while I was making it, my grandma loved to come by and pet it. She is a better knitter than I will ever be, having made me two blankets and a huge lovely afghan for my mom, but I don't think she has ever had anyone knit anything for her. I chose a multicolored purple yarn for her since purple is her favorite color. Sadly, me being me, I started this scarf back in January. I stopped knitting on it months ago, but now I am determined to finish it up for her! It will definitely be ready by winter! Hee hee!

I used this pattern called the Tipsy Rib Scarf. I love this pattern because since it is so repetitive, I don't need to carry around instructions. Great project for beginning knitters!

I have been having lots of fun with wire jewelry recently (for evidence, see my Etsy page...), so I think I am going to play with this medium for awhile.
So, I have been watching X-Files recently and was thinking.... What about wire crop circles? They always have such interesting designs and there are loads of different kinds out there. I can try to make them out of wire, right?
Well, I have already started! This is the first one I am playing with:

I found this crop circle picture here. Right now I have the main shapes done, but a long way to go to finish the rest of the wire wrapping. Also, I need to find some interesting new beads to add on....

That is all for the moment. Back to the crafting!
I listed my first four items on Etsy!! Yay!!
I have around 6 more finished to list, but I haven't had the chance to write up little blurbs about them yet. It actually takes quite a bit to get the pictures and everything in order to actually get the listings completed, so I will be more prepared for that the next time around.
Also, it seems that I need to learn how to take pictures specifically for Etsy... Some of them aren't centered quite right. And I need to be more creative with the naming.... *cringe*
Anyways, nothing new to report on the crafting front. It seems that I have taken off with the jewelry making at the moment. Need to actually do a few knitting projects as well. Also, on the etching front, it seems the glass etcher I ordered wasn't the kind of item I was looking for. I ordered a Dremel Engraver which is quite a bit more heavy duty than my old Inland glass engraver. I decided to return it and am going to reorder the same Inland model I used to have. It is a great little engraver that is perfect for random etching projects. It probably isn't as durable as the Dremel, but it works perfectly for etching wine glasses and such.
That is all for the moment. I have to go do the dishes now. *sigh*
Found my camera! Yay!
So, first of all I finally put that copper wire pendant I made onto a chain. Also added a few beads. I really like how this one turned out and I almost hate to send it away.

This next one was made with picasso jasper beads with a few turquoise beads thrown in. I just love how every jasper bead is so different! Also, I got the idea for the clover head pin from this web page. Apparently there is a tool called a WigJig that is specially made to form wire loops, but it is quite easy to get the same effect using only a pair of round nose pliers.

Lastly is a necklace I whipped together using these pearlescent glass beads that have been sitting around in my jewelry kit for years. Quite a simple design, but I just really like these colors.

That is all for now. Just waiting for my new glass etcher to arrive in the mail! Yay!